
John "Sean" Greenslade
Panoramas Part 2 - Shooting
Shooting the source photos for a panorama is by far the most important step of the whole pano process. Without good source photos, you'll never be able to make a good pano, period. I've spent many painful hours attempting to repair a bad pano because of bad photos, and that's not a road you want to go down. So shoot it right, or shoot it again.
Location
Before you start shooting, you need something to shoot. Sounds obvious, but it does require some thought. Make sure it's a location you have permission to photograph. You'll be there a while, and it's very hard to be covert. Try to avoid very crowded areas. Not only is it become a hassle to deal with all the inquisitive people, but stitching a scene with large, moving crowds is always messy. It is possible, however, to construct an empty or full scene with careful timing of your shots, assuming people are coming and going.
Beware of clouds, water, and swaying trees / foliage. Like crowds, these are very difficult to stitch without leaving weird seams. The ideal scene is an indoor area with few or no people / moving objects. Try to get yourself in the center of the scene, equally distant from all walls. Make sure there is nothing but flat floor beneath the tripod (more on this later).
Lighting
Since we're capturing an entire room in all directions, lighting can sometimes be a tricky proposition. Your lighting must be fixed for the duration of the shoot, otherwise shadows will shift and ruin the uniformity of the scene. This means if you're using the sun for light, you'll need to be quick about it. Moving shadows outdoors can be a pain.
Generally, I'll attempt to use only the natural lighting of the room. Turn on all of the lights in the room. If the room is still, slow shutter speeds can be used to account for lower amounts of light. If additional lighting is required, make some attempt to hide it in the room (behind a couch, for example). Try planting lights that make sense in the space, like desk lamps. If you have the equipment to do so, a photography scrim might be of use to dim bright sunlight coming through a window and even out a scene's lighting. Do NOT use any on-camera flash or light!
If you're outside, try to find an area that doesn't have direct sunlight, or do your shoot on an overcast day. Pointing your camera directly at the sun never results in good images, and bright sun from off-angles can induce some nasty lens flairs in cheaper lenses. Also, shadows can be a pain to deal with in direct sunlight, and you probably don't want an ugly tripod shadow right in the middle of your pano. (There's a section on how to fix this issue if it's totally unavoidable in the cleanup page.)
Camera
Use the best camera you can get. DSLRs (or their mirrorless cousins) are ideal, since they offer some more advanced features that are useful to us, but you can make do with just about any camera. If you have a compatible Canon camera, installing Magic Lantern can give you some useful tools to help with shooting panos. One definite requirement for high-resolution panoramas is a tripod mount. We'll get to that a little later.
Ideally, use a "prime" lens (i.e. no zoom, fixed focal length). This helps keep the pictures uniform, since our software will be attempting to guess the focal length of the lens during the alignment phase. If you don't own one, just use your zoom lens but make sure you never change the zoom throughout the entire shoot. The choice of focal length is a matter of preference, but it does affect our process. Longer focal length (higher zoom / narrower FOV) images result in a higher resolution final pano. To do this, however, requires more source photos to get full coverage. This means more data, more work, and more processing time. It also makes certain types of stitching artifacts more likely, since there are more total seams in the final stitch. For reference, most of my panoramas use 18mm / ~63 degree hFOV with my Canon T3i's kit lens. This results in a final panorama of approximately 30,000 pixels wide at the equator. Full coverage requires about 60 different images, not counting any HDR brackets.
Settings
To get the best source images, the following settings adjustments should be made:
White Balance - set this to something fixed. There may not be an ideal setting for the whole scene, but don't leave this on auto! Choose one, or do the manual white card setting.
Aperture - set this to something fixed. Aperture priority mode is rather useful if you're afraid of going full manual. Ideally, use a fairly tight aperture. This keeps more of the scene in focus.
ISO - This affects how grainy / noisy the final shots will be. It's not absolutely required that this be fixed, just try to keep it as low as you reasonably can.
Shutter - This is OK to play with. Adjust this to keep your ISO and aperture fixed as much as possible. Just remember that long shutter times can introduce motion blur, and require a very stable tripod and bracket.
Flash - Just say no! (You can use hidden remote strobes placed in fixed locations in the room, but continuous lighting is generally perferable. Bounces are very hard to perform effectively in panos.)
Format - RAW is nice, but the files are big and can be hard to deal with if you're not used to it. RAW can be an alternative to bracket shots in getting HDR, but is not strictly necessary. If your camera supports RAW+JPEG, use that (assuming you have the card space for it). Otherwise set your camera to the highest JPEG quality it supports.
Tripod
Try to get a sturdy tripod. Flimsy tripods are just a pain, and sometimes cause more problems than they solve. But what's maybe even more important than the tripod is the bracket head. To understand why we need one, we must understand parallax. Parallax is the shifting of scene objects in relation to each other due to the camera position changing. Parallax is the enemy of a perfect stitch, and you must work very hard to prevent it during the shoot. There is nothing that can be done short of a massive photo manipulation nightmare to fix parallax issues once they've been shot. Thankfully, with a small bit of understanding of lens optics, we can prevent parallax. I will refer you to the source I learned from: John Houghton's webpage on finding the no-parallax point. With this info in mind, along with some references to some other people's variants of nodal tripod brackets, I constructed my own nodal rotation bracket using less than $20 worth of parts from Home Depot:
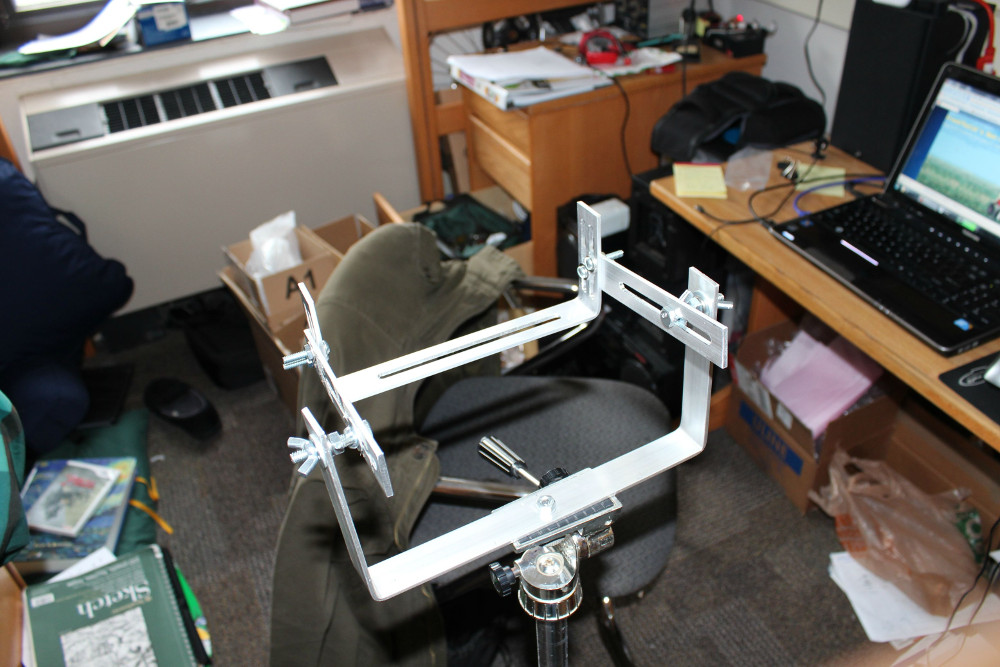
Yay, messy dorm room! So what does this bracket do? Basically, there's a specific point somwhere inside the optical train of the lens where all the rays of light entering the lens cross. This is called the nodal point, and by rotating the camera around this exact point, the scene exhibits no parallax. This bracket has all the adjustments needed to align the rotation point of the tripod to the nodal point of the camera lens. It's also a total bitch to adjust, so I only ever use it in one camera / lens configuration. Someday I'll build a revision 2 with better adjustments. Someday...
It also helps to have a remote shutter release so that you don't have to touch the tripod and risk blurring the pictures. I built one from assorted Radioshack parts (R.I.P. Radioshack) that, while rather ugly looking, does the job just fine. Really, all you need is a wire, a button, and the 2.5mm connector (at least for most Canon DSLRs).
Angles
Now you need to shoot all your angles. It helps to work methodically, keeping one axis locked off and rotating the other. Due to the way my bracket works, I set a pitch angle first and do a 360 degree belt of photos at that pitch. The number of photos increases as I get closer to the center, then decreases as I finally get to the bottom (nadir point). The more consistent you are with your locations, the easier the rough aligment will be later. Try to always start a new belt at the same rotation point, for example. I also tend to use the live preview mode along with a rule-of-thirds overlay on the screen (thanks, Magic Lantern!) to help determine how much I need to rotate while still keeping sufficient overlap. As a rule of thumb, at least one third of the shot should overlap the previous shot. Additionally, there's no harm in taking more photos than you need, but you'll be kicking yourself if you miss any spots, so definitely err on the side of more overlap (though don't go over 50%, since that can cause different problems).
Always keep a close eye on your focus during the shoot. A blurry shot is nearly useless, so don't be afraid to reshoot. Some frames may not be able to get the entire scene in focus, even with a tight aperture. In these cases, shoot the same frame multiple times, once for each area that needs a different focus setting. These can be stacked together later on to get everything in focus.
Also, keep in mind any potential trouble spots. Those fall into two categories: hard to align, and likely to glitch. Hard to align areas don't have much contrast. These are things like large, blank walls / ceilings, or carpets with a very fine, regular pattern. The auto-stitcher has trouble finding control points on these surfaces, and will likely make a mess of things without manual intervention. If you can, try to place things in these regions that give contrasty reference points. A picture hanging on a wall is ideal, but if you're desperate you can use stickers, masking tape, blue tack, etc. Small specks of a contrasting color are ideal, and can be clone stamped out later.
Likely to glitch things are generally sources of hard-to-fix parallax. Objects very close to the camera will almost always induce some parallax no matter how well your bracket is tuned, so the main fix for this is to set your FOV such that you can fit the entire object in frame. While shooting, make sure you get at least one shot with the object fully in frame, as centered as possible. Do this in addition to your regular shots, and ideally do it for all objects that are likely to have parallax issues or be focal points of your pano.
The Nadir of Doom
As I mentioned earlier, one of my goals was to make the nadir (south pole / bottom point) look good. Most "full" spherical panos take a cop-out here, putting either a black circle, a copyright text, or something else to just patch over the legs of the tripod. I wanted something better than that, so as a final step in shooting, I need to capture a clean nadir shot. If you followed my advice and made sure there's nothing but flat floor beneath the tripod, this is easy. Just take the camera off the tripod, move the tripod out of the way, hold the camera out approximately where it was before, and shoot a few photos of the floor. Exact alignment and position aren't required for this since it's just a flat area that's easy to correct. Though I'd still recommend against it, you can use a flash here if the photos are coming out blurry. I'd recommend boosting the ISO and widening the aperture first, however.
A Word of Warning
Beware: it's very hard to notice every single thing that can be done wrong in this stage. Once you start stitching, you'll more than likely notice something you wish you had caught earlier. I would suggest starting the stitch as soon as possible after shooting. That way, if your mistake is big enough, you may still have the chance to return to the location and redo your shoot. There's no worse feeling than realizing you messed up your shoot after you've lost the opportunity to go back and re-shoot.
So now you have your photos. Excellent! It's time to move on to part three: stitching.