
John "Sean" Greenslade
Panoramas Part 3 - Stitching
The majority of this article is written with Hugin 2015.0.0 or the development nightlies around the end of 2015. Hugin is still very much in active development, and as such is a moving target. This is basically a disclaimer saying if the buttons have moved around since then, it's (probably) not my fault.
Organization
Keep your files organized, or your life will be full of misery, pain, and sadness. That's actually good general life advice, but it applies particularly well here. Make a directory for each pano scene you do, and put all the raw source images for that scene in one subdirectory. Hugin works well with relative paths, so this type of hierarchy can tranfer between different computers with no trouble.
What You Need
RAM. You need RAM. All the RAM. Seriously, go get some more RAM. Hugin & friends like dealing with uncompressed images, and that will very quickly eat up all your RAM. I've found that to effectively fuse and blend full-resolution panos (30,000 px wide), 16GiB of RAM was just barely enough. Of course, you can make do with less. All these apps have various command line flags to limit memory usage. This causes the disk to be used for caching, however, and may bring you system to a crawl while stitching operations are going on.
You'll also need hard drive space for all these files. My panos average 1 to 3GiB per scene. Having a NAS is useful, however your network can become a bottleneck during the rendering stages. I'd suggest keeping the current pano you're working on in your local computer HDD.
Some stages of the render can be GPU accelerated, however having a fancy GPU is by no means a requirement. Hugin works perfectly fine on Intel integrated graphics. If your computer can play fullscreen Youtube videos, it can probably handle Hugin.
Hugin is a cross-platform app, so you can use whatever computer and OS you want. All of my work is done in Linux, however it should all work on Windows and OSX without much trouble. I also use GIMP, another cross-platform app, to edit and manipulate photos. If you're more familiar with Photoshop or another image editing tool, feel free to use it instead. Probably the fanciest thing I ever do in GIMP is use the clone stamp.
Stacks and Rough Alignment
If you've chosen to do bracketed LDR shots as I did for most of my panos, the best course of action is to allow Hugin to manage these stacks. You could fuse the stacks prior to bringing them into Hugin, which does simplify things a bit. I'd recommend letting Hugin manage the stacks, however, since this gives the added benefit of being able to fix alignment errors inside the stacks. Sometime the movement of the shutter mechanism in the camera slightly mis-aligns the individual photos in a stack, and fusing these photos as-is would cause blurring or blending artifacts.
If you've shot in RAW, there are two options. One is to create "virtual brackets" by rendering the RAW at several different exposure levels and then fusing them. Another possibility is to render the RAW files into an HDR format that Hugin can recognize. Since I've never done either of these, I'll leave that as an exercise for the reader. My current process is bracketed JPEGs stacked in Hugin.
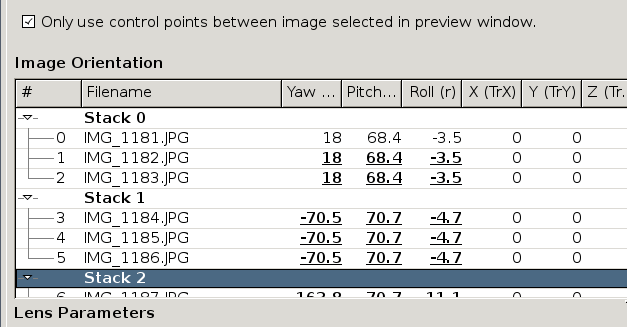
If you import all the images at once (leave the handheld nadir shots out for now), Hugin will usually auto-detect the fact that they are stacked. If it doesn't, you'll have to go through the list of pictures and set the stacks manually. Select all the images in a given stack and right click -> Stacks -> New stack. I've considered writing a python script to do this automatically, but it doesn't happen often enough to warrant it.
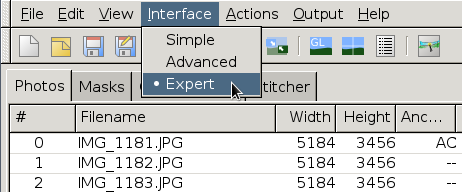
Quick little aside: Hugin has an Interface selection menu, with options for Simple, Advanced, and Expert. We're experts, of course, so we'll be doing everything in Expert mode. If something seems missing from the UI, make sure you're in Expert mode:
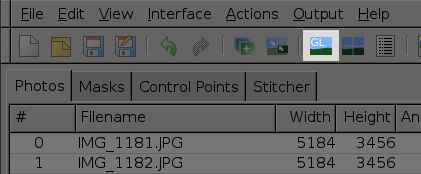
Hugin has two preview windows, the Preview window and the Fast Preview window. True to its name, the Fast Preview window is indeed very fast and has more useful features, so we'll be using it for nearly everything.
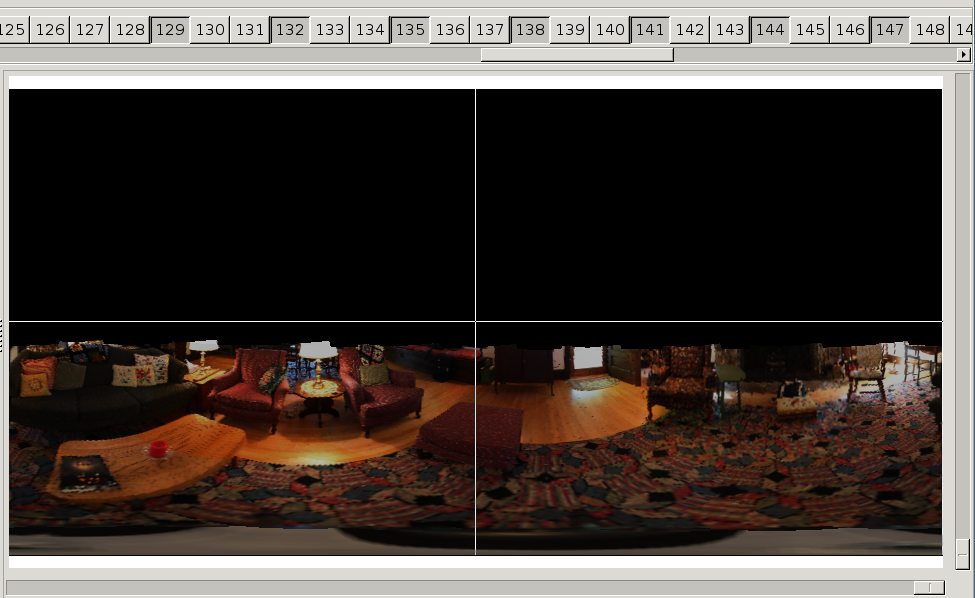
Now it's time to do a rough alignment. By default, the images are either all in the same place or spread out randomly. The control point finder usually does an OK job if you just turn it loose straight away, but it will work much faster and more reliably if we can give it some hints about how the images are connected. Also, having a rough alignment will let us throw out completely bogus results right away (more on this later).
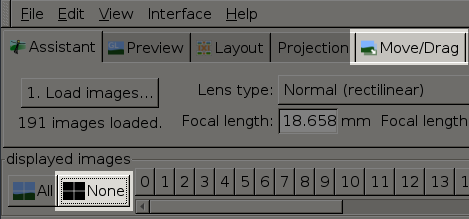
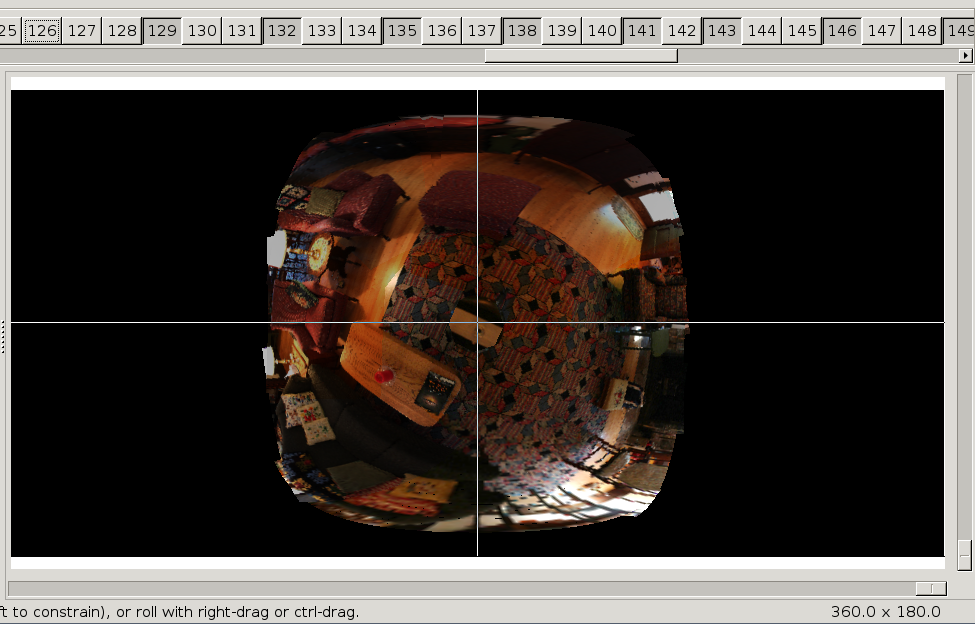
Launch the Fast Preview window, switch to the Move/Drag tab, and click the Display None button to turn off all images:
The display stack is ordered from top to bottom, meaning that lower-numbered images display on top of higher-numbered images. If you followed my shooting pattern, the higher number images will be the ones pointing at the floor. Start by enabling the highest number image. The tripod will likely be visible in this image, but that's OK. Use it to put the nadir point (the pivot of the tripod) in the center of the pano. Approximation is fine here, this is just a rough alignment. Use left-click to drag and right click to spin. (The spin control can be a tad unintuitive at times. Play with it for a while to get used to how it behaves.) If the drag mode is set to Normal and there are no control points in the set (as should be the case right now), every image can be moved independently.
Now just keep moving up the image chain. If you're using stacks, you only need to enable one image from each stack (e.g. every 3rd image for normal 3-stacks, as shown below). Rough in the alignment of each image until you start getting close to the edge of the screen.
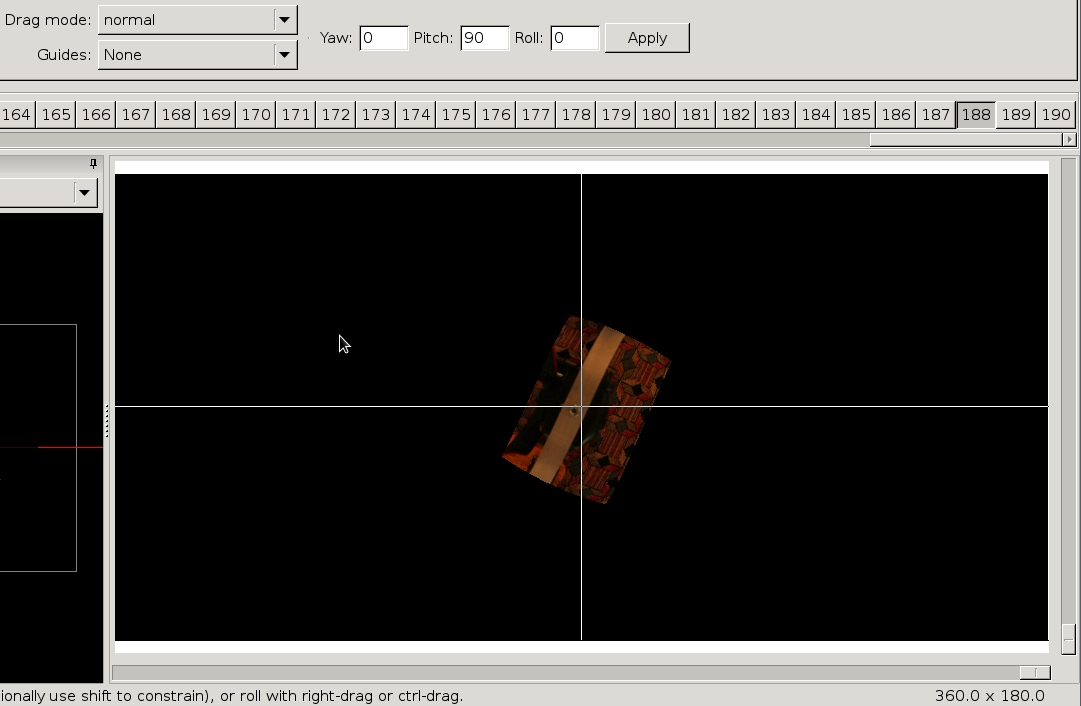
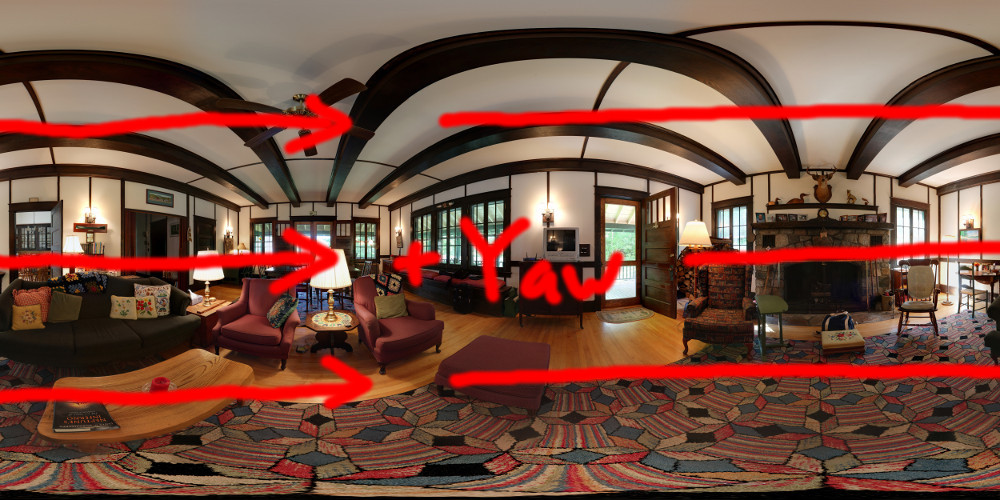
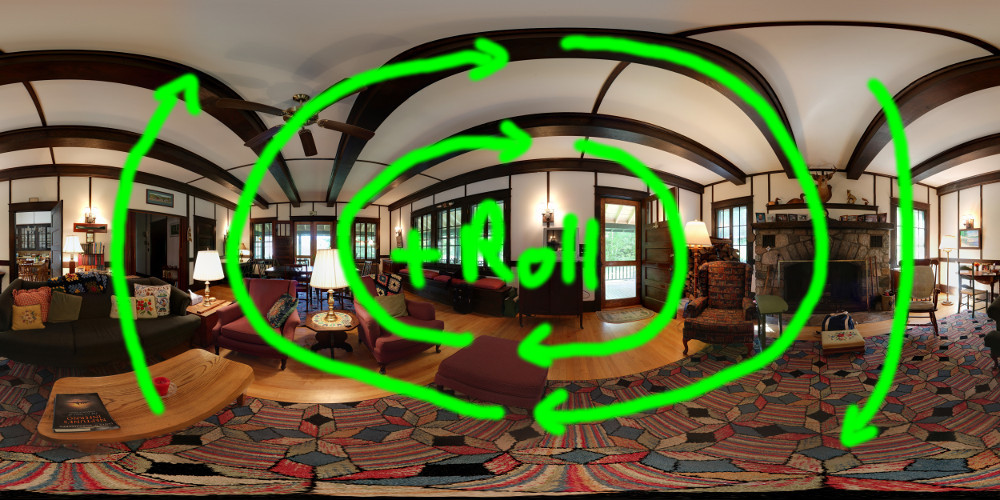
Since the center of the screen is the least distorted, we want to keep our work area near the center. Thus, we'll spin the whole pano so that the bottom (which we've been working on) is actually on the bottom, and continue working our way up. To spin the entire pano an exact amount, we can use the Yaw Pitch Roll entry boxes:

Simply stated, the Yaw control pulls the whole image left or right (remember that the image is continuous, so it wraps from one end to the other). The Pitch control drags the center of the image up or down. Since the top and bottom do not wrap, this has the effect of spinning the image from the center to both outside edges. The Roll control rotates the entire image left or right. See the following diagrams for a more visual explanation:
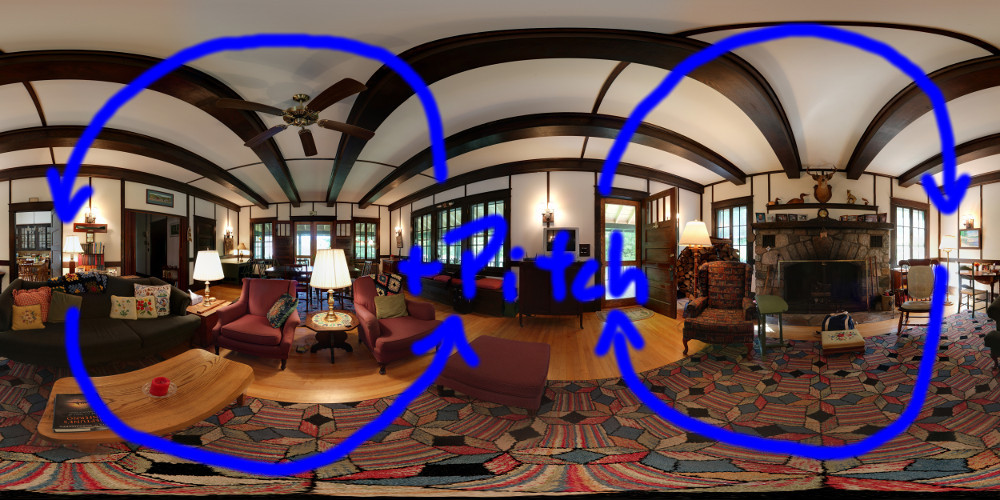
Thus, to move the center of our pano down to the bottom, we'll use the pitch control. Type -90 into the Pitch box and hit Apply. Now the pano should look like this:
Finish the rough aligment, pitching 90 degrees again if you need to see the ceiling clearly. Remember, this is rough aligment, so it doesn't need to be perfect.
Masking
There are still bits of the tripod in a bunch of our photos. To keep this from making its way into the final blend, we need to mask out those areas. Switch back to the main Hugin window and go to the Masks tab. There, you will find all the source images listed. Scroll down towards the bottom and find the first image that has tripod showing. Click Add Mask, then start drawing a polygon around the area. Right click to place the final point. Select the mask in the mask list and change the dropdown to Exclude Region from Stack.
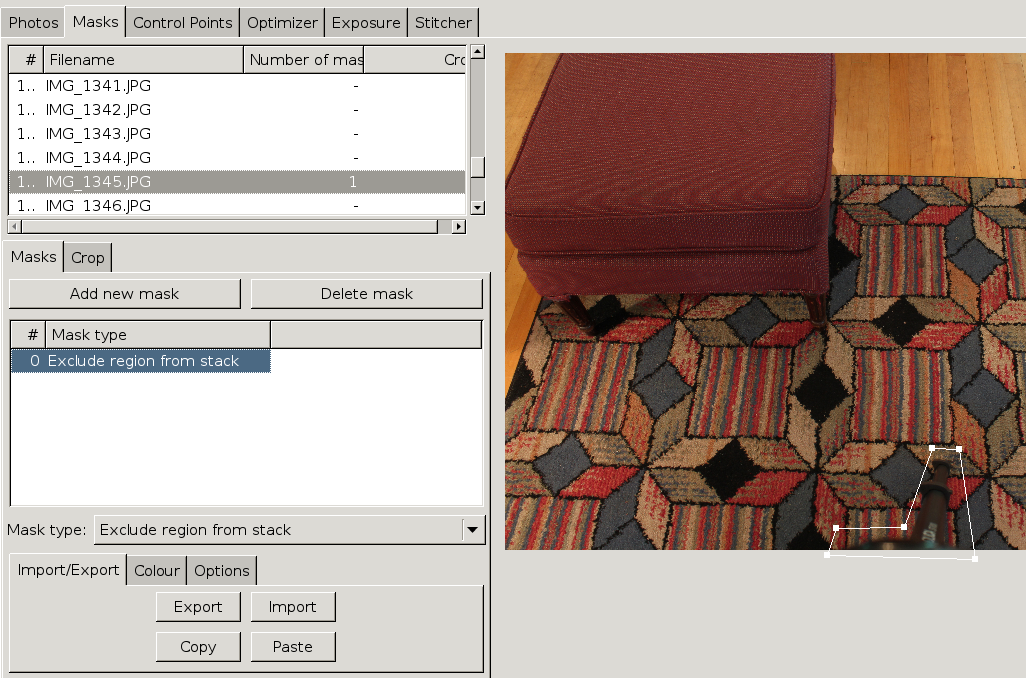
Exclude from stack applies the exclude to all images in the same stack. Thus, you only need to apply the mask to one of the stacked images in each stack. Make sure to mask the tripod out of every stack / photo it appears in. Also keep an eye out for feet, camera straps, and other things that shouldn't be in the final image. You can even mask out lens flairs, hot pixels, and other aberrations, assuming the area is adequately covered in other shots. If you mask too much, you may end up with holes in your pano where no image covers. We have a pretty big hole right now where the tripod was, but we'll use our nadir shot to patch that up later.
I generally avoid using include regions. They make the blender's life more difficult by eliminating overlap regions at their seams. An include region basically applies as an exclude region on every other image that touches that same region, even across different stacks.
Control Point Detection (the lazy way)
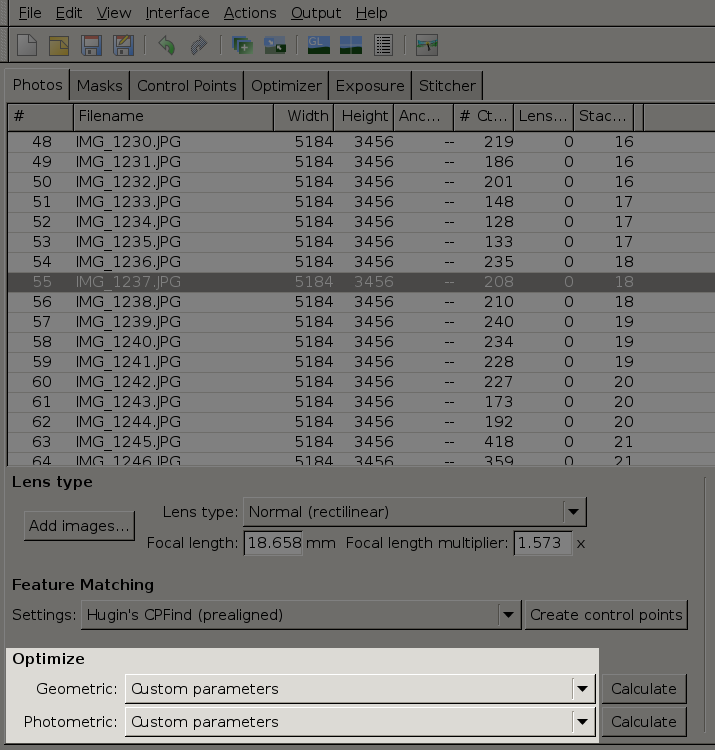
So now we need some control points to fine tune our panorama's alignment. Ideally, we'd do these by hand, but a good alignment needs literally thousands of control points, and I certainly don't have the patience or attention span for that. So enter CPFind, a lovely little utility that does our work for us (kind of). Switch back to the Photos tab in the main Hugin window, and set the Feature Matching dropdown to Hugin's CPFind (prealigned):
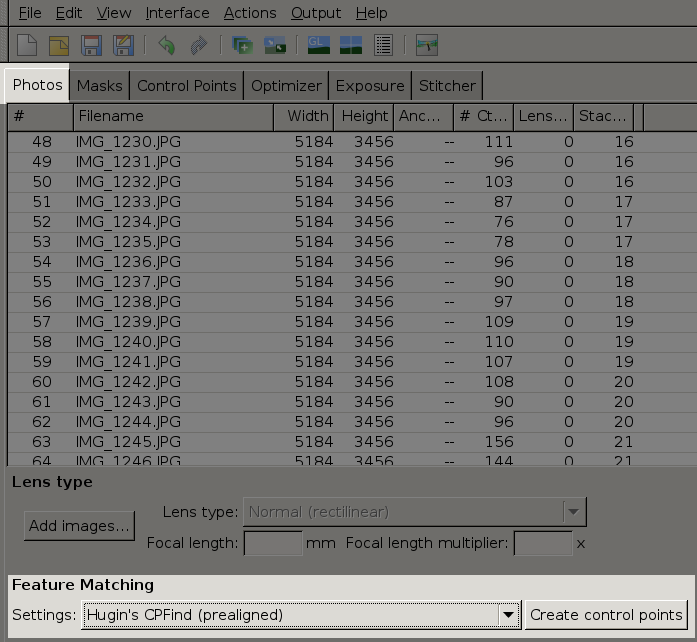
Click Create Control Points, then go make yourself a sandwich. This process takes a while. Depending on how big your images are (and how much RAM you have), it could take hours. There's no pretty pictures, either, just some scrolling text.
...
All done? Super! Now we need to find all of CPFind's mistakes. This is actually reasonably easy, given that we did all that prealignment. We know that (assuming we did a halfway-decent job lining things up) our images can't be hugely off. So give that F3 button a slap (or open the control points list from the menus) and click Select by Distance.
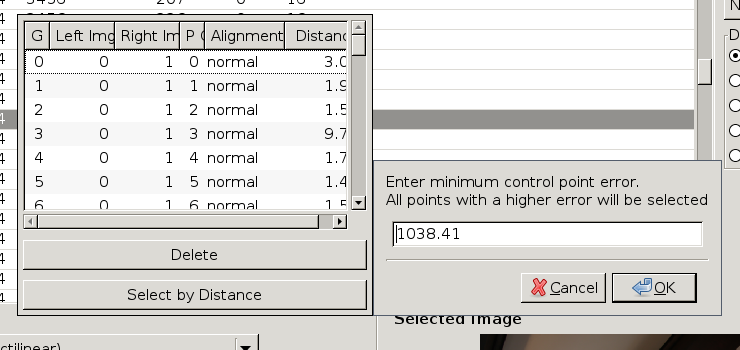
Hugin auto-fills a guess in the box, and it's not always a good guess. I suggest starting with 1000, since anything over this is obviously totally invalid. Click OK, then click Delete. Now there are fewer control points, but the ones that remain are ones we're more confident in.
Progressive Alignment Optimization
Hugin now has enough information to start attempting to optimize the panorama. Optimization in this case means attempting to get all the control point pairs as close to each other as possible. The optimizer works within a certain set of constraints that we define. Basically, we're going to tell Hugin at first all it is allowed to do is move the photos around. This is to prevent the pano from exploding if there are a significant amount of erroneous control points. The optimizer tends to go overboard with the distortion parameters if it's allowed to touch them too soon.
Since we're experts (we set the UI to expert mode, remember?), we're going to control the optimizer parameters by hand. Go to the Photos tab of the main Hugin window and set both Optimize dropdowns to Custom Parameters:
Note that we'll get to photometric optimization later on. For now, all the optimization we're doing is geometric. Once you select custom for the optimizers, two new tabs will appear. Switch to the Optimizer tab:
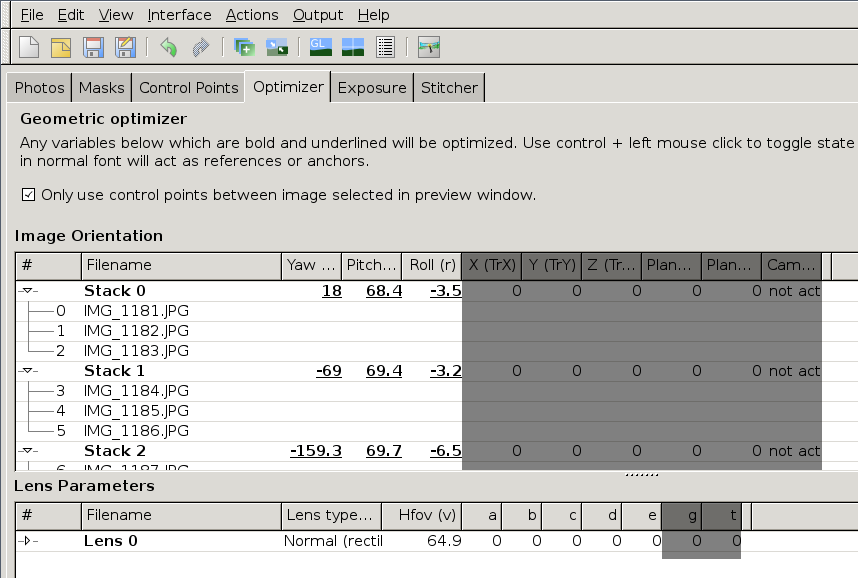
There are two parts to geometric optimization: photo parameters, and lens parameters. Photo parameters apply to individual photos, and the only ones we need to worry about are Pitch, Roll, and Yaw. Lens parameters apply to a set of photos. Each photo has an assigned lens, and the lens parameters are applied identially to all photos that are set to that lens. The important lens parameters are hFOV, lens distortion (a, b, c), and image center shift (d, e).
Note that Hugin can also stitch planar mosaics, which optimize different types of variables. You can't mix the two, however. The darkened variables are ones used for mosaics, so we won't ever touch them. Note that if you do enable them, Hugin will complain and not optimize.
Since we only have one camera and one lens, all the images should be set to lens 0. We'll start by optimizing positions and hFOV only. We need to optimize FOV because without knowing the correct FOV, Hugin cannot wrap the pano a full 360 degrees. Also, FOV is not nearly as sensitive to control point errors as the distortion parameters are. Notice that the FOV parameter already has a value in it. This was filled in based on the metadata the camera stored in the images, and it's just an approximation.
Right click the Yaw column and click Select All. Every Yaw parameter should now be underlined (meaning it is activated). Do the same for Pitch and Roll. Note that the stacks currently share their position parameters. This is fine for now, as it'll speed things up. Later on we'll break the stacks apart to allow the optimizer to line them up perfectly. Control-click the hFOV parameter in lens 0. Now all the parameters that the optimizer will touch are underlined (activated).
I always suggest saving before running an optimize operation. Undo does work, however the optimizer will on occasion make a huge mess of things, so better safe than sorry. So save, then click Optimize Now! (Yes, Hugin is very excited about this.)
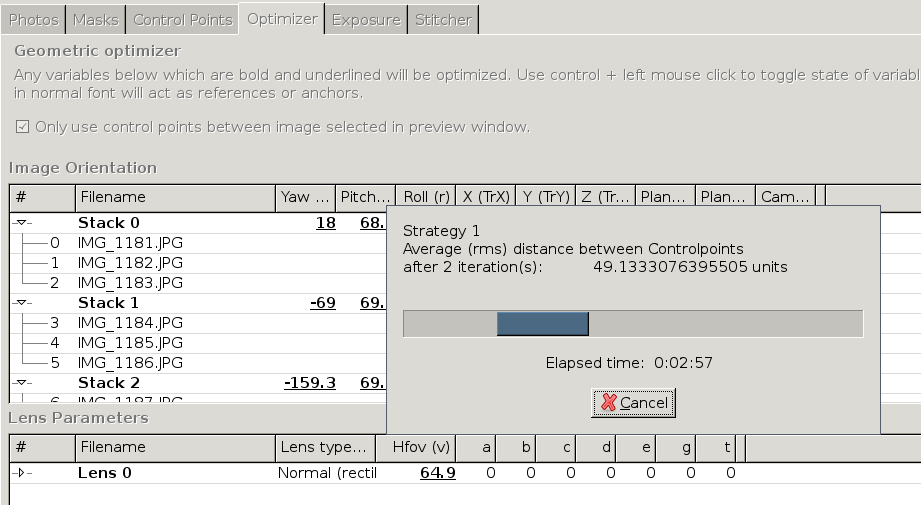
The optimizer is CPU bound, since it is single-threaded. It will also be deathly slow at the beginning, since CPFind tends to go a little overboard. But we'll keep culling the control point set as we go, so this operation will actually speed up over time. For now, go a drink to wash down that sandwich.
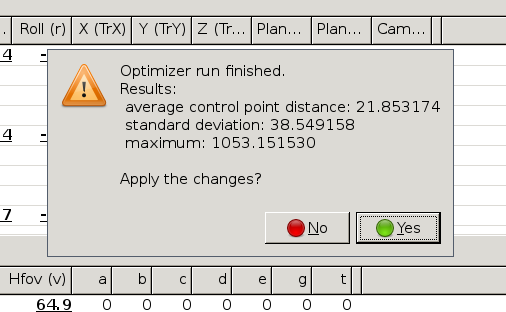
Once the optimizer finishes, you get a little report window. For now, just click Yes to accept the changes:
Go back to the Fast Preview window and assess the damage. If everything looks more or less still aligned, you're in good shape. If your pano now looks like an M.C. Escher piece, you have some work to do. This generally means there are too many erroneous control points. If this is the case, it makes the most sense to undo the failed optimization and do some more control point culling.
At this point, you may also want to manually inspect some of the potential trouble spots. Wherever there are areas of low contrast, there is a higher likelihood of CPFind making mistakes. Take a look at the following example:
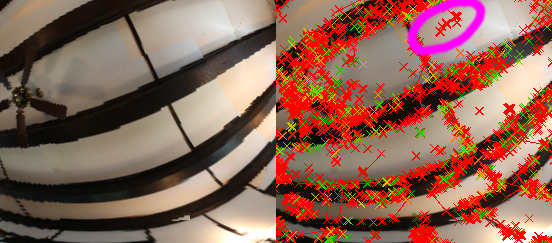
In the Fast Preview window, checking the Show Control Points box will place little X marks over every control point pair. The color refers to how well-aligned the control point currently is (note that this is NOT an indication of whether the control point is correctly placed or not). Green means good (sub-pixel) accuracy, yellow means iffy (1-2 pixels off), and red means bad. Most of our points are red right now since we haven't done any distortion correction, but that's fine. What we're looking for is areas that have questionable control points. Take a look at the circled set of control points. They seem to be in the middle of a white ceiling with no contrast. Those control points are likely wrong, so let's take a closer look at them. Click Identify, then hover over the zone you're interested in.

I have all stacks enabled, so I see 6 images here. Let's take a look at images #6 and #9. Go back to the main Hugin window and select the Control Points tab. Select the two images in the two sides.
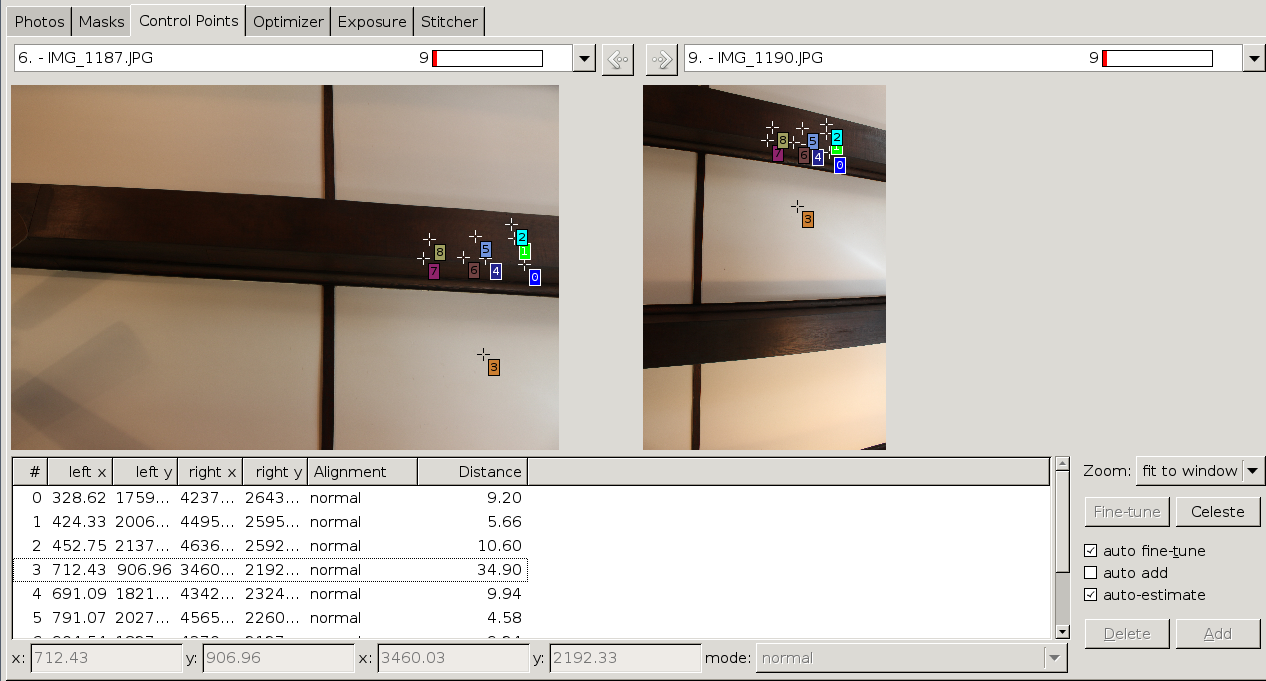
Notice control point 3, out there in the middle of nowhere. If we select it from the list below the images, Hugin will show us the alignment aid. This is a box that shows a high-contrast, zoomed version of the region around the control points. Take a look at this bad control point:
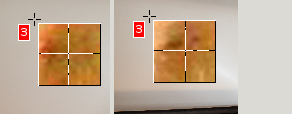
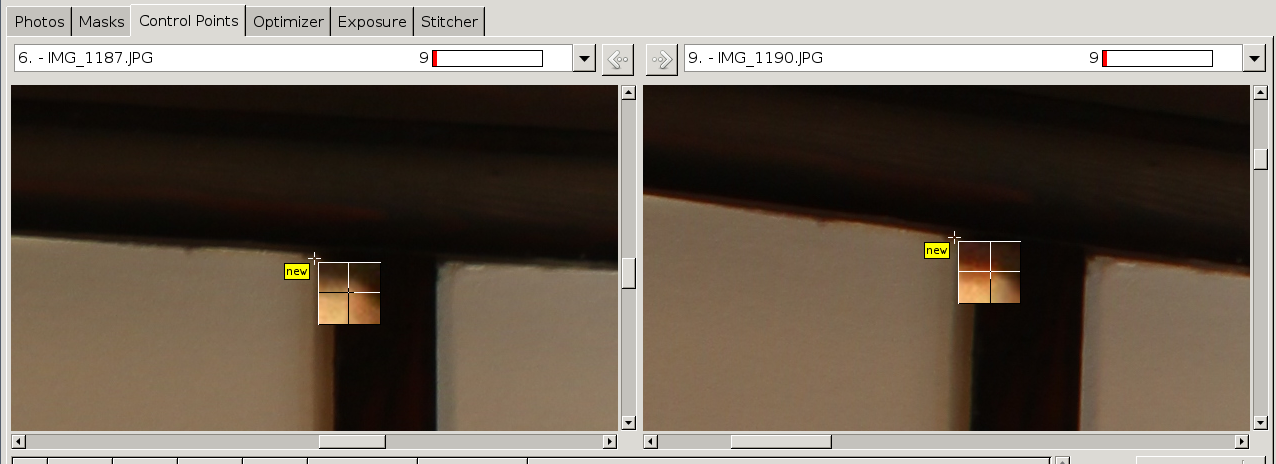
Looks pretty iffy. Let's delete it. Though to be honest, none of these control points look stellar. Let's add a couple of good control points. Corners are my favorite places for control points, and we have a couple of good ones here. As long as the Zoom dropdown is set to Fit to Window, the control point adding process works in three steps. First, click roughly where you want the control point in one of the images. The image will zoom in and show the alignment aid. Second, click and drag the point to the exact position you want to use. Now Hugin will attempt to match that point on the other image. If it worked, just right click to accept the point. If it failed, drag the second point to its correct location, then right click to accept.
Keep on culling control points with the Select by Distance tool, deleting obviously wrong points, and adding new points. Note that you want a decent number of control points spread out as far you can on each image. Lots of points right next to each other are not as useful.
Re-run the optimizer after each round of control point editing, and get the pano to the point where the largest control point error is below 50 pixels (the optimizer report window tells you this value). Before we continue, we need to trim the control point set down even further. As I mentioned earlier, the distortion optimizer is prone to doing crazy things, so we need to give it only the best control points. Luckily, there is a handy script to do this for us. In the main Hugin window, go to Actions -> Control Points -> Keep 5 CPs per Image Pair. This script will go through and delete all but the best five points in each set of images. Most of the time you won't need more than five points anyway, and this culling will significantly speed up the optimizer.
At this point, assuming your worst control points still look pretty good (less than 5 pixels off), we can start turning on the distortion parameters. Back in the Optimizer tab, start by enabling just parameter a (control click to enable in lens 0 and run an optimize. If the parameter goes completely off the wall, Hugin will warn you not to accept the changes. Even so, the parameter should be very small. Think somewhere in the vicinity of 0.05, though it will of course depend on your camera and lens. If all goes well, enable the rest of parameters in sequence (a through e), doing an optimize and sanity check between each one.
Now it's time to break apart the stacks so that they can be optimized. I wrote a python script to do this for me, but you can do this manually by going down the list of stacks in the optimizer and right click -> Unlink each one.
Notice that each image now has separately-adjustable y/p/r variables. Also note that the first image has its variables disabled. Make sure to turn those back on before continuing (though you can leave one image's yaw optimizer off to keep the whole pano from spinning randomly after each pass). Re-optimize once more, and now you should (in theory) have perfect alignment.
Draft Rendering
This is the point where certain types of errors become hard to see in the preview window. To check our progress, we will have to render the pano. This is sometimes easier said than done, especially if you're lacking in the RAM department. Ideally, if you have more than one computer and more than one pano to work on, you can set one computer (the one with more RAM) on rendering a pano and use the other to work on the other steps of a different pano. Yay pipelining!
Sadly, none of the work that the rendering steps do can be re-used if you re-optimize the pano. So to make good use of your time, I suggest doing these draft renders at a reduced resolution. In the main Hugin window, switch to the Stitcher tab:
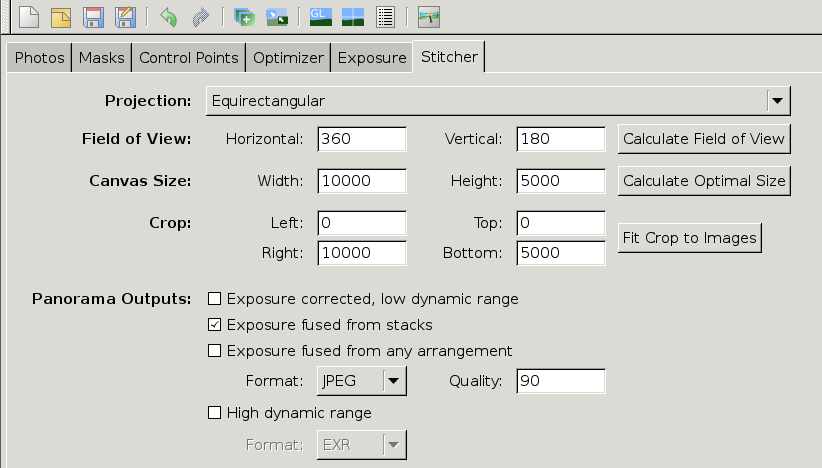
Our Projection should be set to Equirectangular, and since we're doing a full sphere the Horizontal angle should be 360 and the Vertical angle should be 180. The Canvas Size default is probably too small. Click the Calculate Optimal Size button next to the Canvas Size fields. The values that it fills in are the largest pano it can render given the resolution and FOV of the input image set. We'll use this size for our final output, but for now this is too big. Set it to some nice, round value about 1/3 to 1/4 of the calculated size. Just changing the Width should be enough, as Hugin will scale the Height to match. The upper row of Crop values should be zero, and the lower row should match our Size values.
If your pano has stacks, make sure the Exposure Fused from Stacks checkbox is checked (and uncheck all the others in that group). If you have no stacks, check Exposure Corrected, Low Dynamic Range (and uncheck all the others in that group). Set the Format dropdown to JPEG, and the Quality to 90 (lowering this doesn't really save any time at all).
Now scroll down a bit:
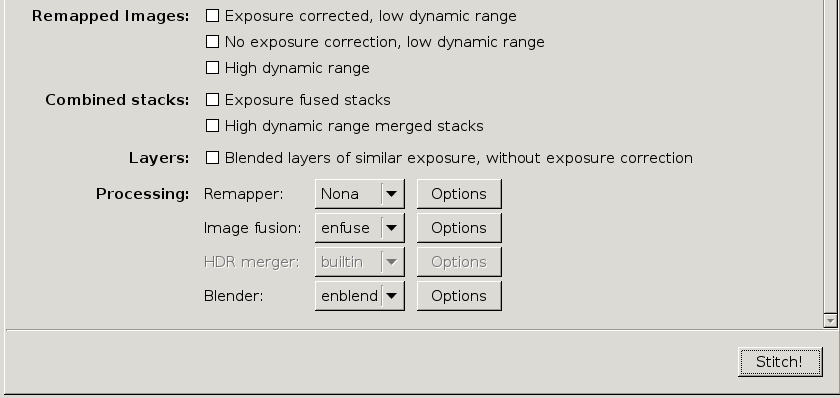
The Remapped Images, Combined Stacks, and Layers sections are mostly used to generate process debug output. We don't really need any of these, so leave them unchecked. If you're feeling particularly adventurous / masochistic / desperate, you can use these stages to manually manipulate the images mid-blend.
There are a few things we need to adjust in the Processing section, however. Enfuse and Enblend both default to using only a very small bit of memory. While this is very polite of them, it means that by default they will disk cache like crazy and take forever and a half to finish. To fix this, click Options next to Enfuse (if you have no stacks, this will be greyed out and you can ignore it). Add "-m[RAM TO USE IN MiB]" (without the quotes) to the Command Line Options field, like so:
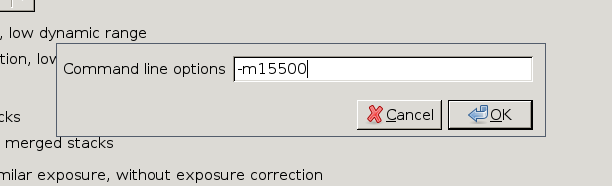
Since my machine has 16 GiB of RAM, I'm telling mine to use almost all of it. Make sure to leave enough RAM for the rest of your system to run. My machine is happy with ~512 MiB, so I chose to give Enblend / Enfuse 15500 MiB to play with. Go as high as you can. The more RAM, the better. Try to avoid using swap, though. The built-in disk cache is more efficient than disk-backed swap.
After setting the memory value for both Enblend and Enfuse (they have two different settings, remember), you're ready to stitch (make sure to save the Hugin project). There are two different ways to do the stitch. If you just want to fire it off quick, you can click the Stitch! button. This will run the stitch with the Batch Processor. If you want to run it on a different computer, or with some customizations for output and scratch directory used, fire up a terminal. Using hugin_executor, we can generate a bash script that will stitch our pano. I usually make a directory called stitch inside my root pano dir. Navigate to your pano dir in your terminal, then run the following commands:
$ cd stitch
$ hugin_executor --prefix=LivingRoom --stitching ../livingRoom.pto --dry-run > run
You will, of course, need to change the prefix name and .pto file name to your specific pano's name. Now the run file contains the commands needed to stitch the pano, using the settings that were saved in the Hugin (.pto) file. If you alter the pano project and want to re-render, you will need to re-run the hugin_executor line after saving the Hugin project.
As mentioned earlier, enfuse and enblend may need to use a disk for temporary scratch files. If you have a preferred disk (e.g. a nice quick SSD) that you'd like the scratch files to be put on, you can specify that with the TMPDIR environment variable. If you don't care which disk it uses, I suggest setting it to ~ instead of the default. By deafult it goes to /tmp, which is sometimes a RAM-backed tmpfs. Why this is bad should be reasonably obvious. If you need a hint, look back to the part where I was telling you about how much RAM the stitching process uses.
To run the stitch, use the following command:
If you're one of those people who hates bash and uses some other weird shell, go ahead and sub in your shell flavor of choice. It's just a list of commands, so really any shell should be able to do it.
If you have lots of RAM and fast disks, this should be pretty speedy. If you don't, well...you should probably go take a nap and come back later.
Finding Faults
So now we have our pano. Look at how awesome it is! Yeah! But wait...what's this?
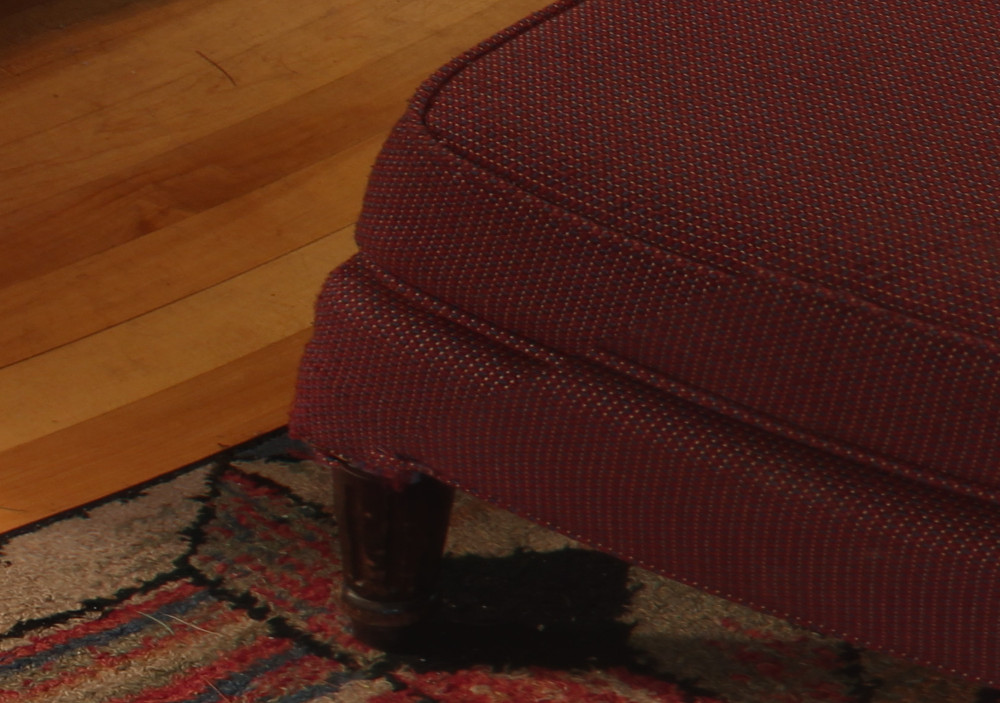
We've found a stiching artifact. How hideous! This one is unfortunately a result of me not following my own advice. This ottoman was very close to the camera, but I did not manage to get a shot where it is entirely in frame. Thus, this is a parallax error that is not easily fixed. Sadly, this error will have to remain as a monument to my mistake. But let's look at something that we can fix:
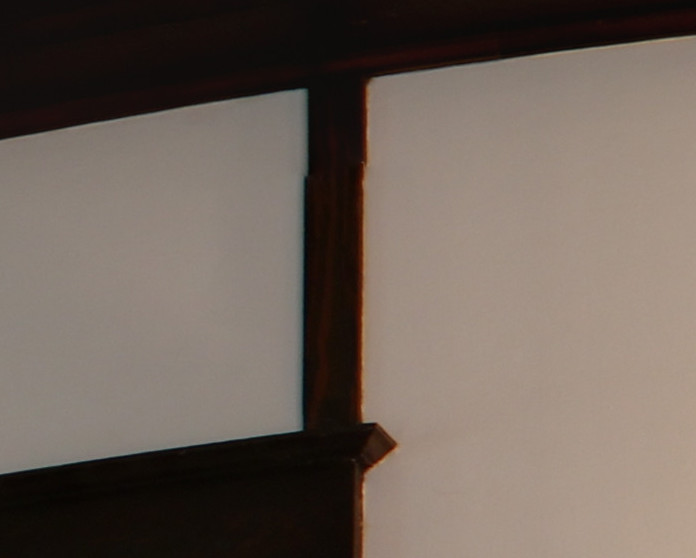
Now, the base issue here is that the alignment is not perfect. We could add lots of alignment control points to the area, but even that may not be enough to fix this. We're talking only one or two pixels of offset, here, which may be within the variance that the distortion correction can't quite account for. Thus, we'll take the easier route:
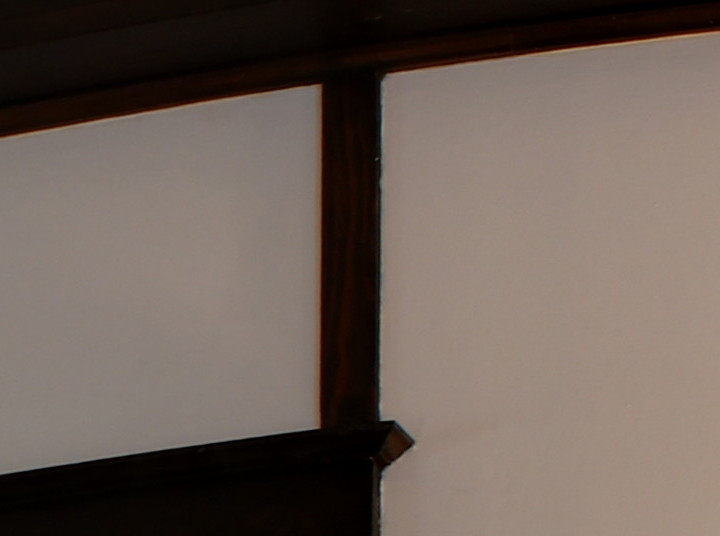
Hiding the Seams
We have this fantastic white wall surrounding the trim piece that is mis-aligned. If we could make the seam happen in the middle of the wall instead, then the blender would be able to completely hide it. And as it turns out, we can do this. All we need to do is take away the opportunities for seams.
Hop back over to the Fast Preview window and turn on Identify in the Preview tab. Hover over the region of interest:
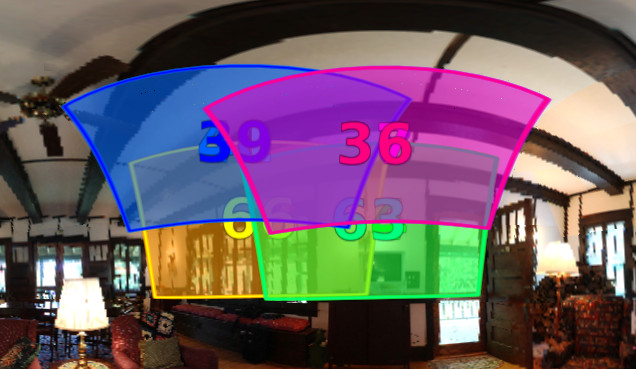
Looks like four different images contain this piece of trim. We really only need one, so let's mask out the other three. Use the Mask tab in the main Hugin window, and mask out the area like so:
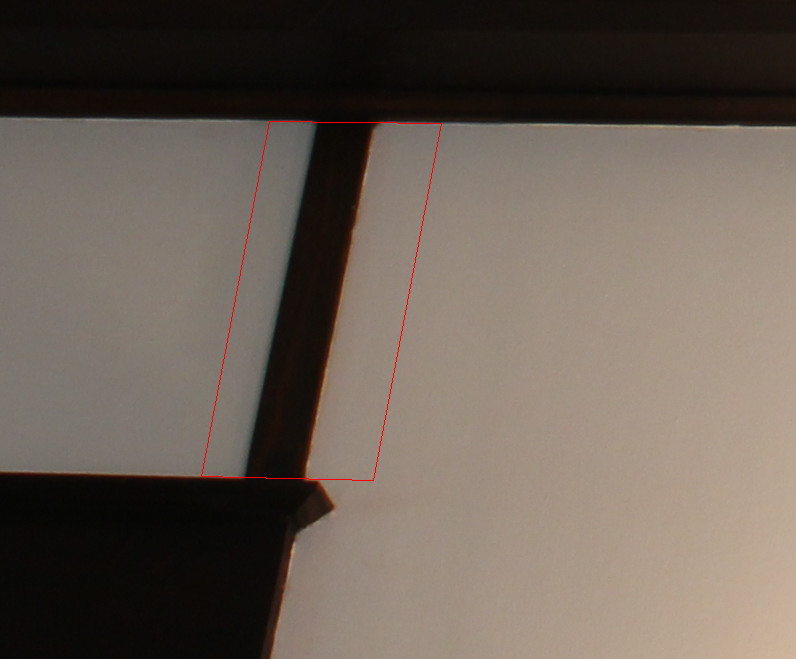
Notice that we line up the potential new seams in the middle of the white wall. We also run the top and bottom edge along the existing lines of contrast so that we don't accidentally create new bad seams.
One quick re-stich later, and we're looking much better:
Also, since I chose the best image out of the four, there is less chromatic aberration now. Sweet!